What Do You Need To Know When Converting A Flash Game Into HTML5?
What Do You Need To Know When Converting A Flash Game Into HTML5?
Tomasz Grajewski2018-07-30T14:00:26+02:002018-07-30T14:40:46+00:00
With the rise of HTML5 usage, many companies start redoing their most popular titles to get rid of outdated Flash and match their products to the latest industry standards. This change is especially visible in the Gambling/Casino & Entertainment industries and has been happening for several years now, so a decent selection of titles has already been converted.
Unfortunately, when browsing the Internet, you can quite often stumble upon examples of a seemingly hasty job, which results in the lover quality of the final product. That’s why it’s a good idea for game developers to dedicate some of their time for getting familiar with the subject of Flash to HTML5 conversion and learning which mistakes to avoid before getting down to work.
Among the reasons for choosing JavaScript instead of Flash, apart from the obvious technical issues, is also the fact that changing your game design from SWF to JavaScript can yield a better user experience, which in turn give it a modern look. But how to do it? Do you need a dedicated JavaScript game converter to get rid of this outdated technology? Well, Flash to HTML5 conversion can be a piece of cake — here’s how to take care of it.
Recommended reading: Principles Of HTML5 Game Design
How To Improve HTML5 Game Experience
Converting a game to another platform is an excellent opportunity to improve it, fix its issues, and increase the audience. Below are few things that can be easily done and are worth considering:
-
Supporting mobile devices
Converting from Flash to JavaScript allows reaching a broader audience (users of mobile devices); support for touchscreen controls usually needs to be implemented into the game, too. Luckily, both Android and iOS devices now also support WebGL, so 30 or 60 FPS rendering usually can be easily achieved. In many cases, 60 FPS won’t cause any problems, which will only improve with time, as mobile devices become more and more performant. - Improving performance
When it comes to comparing ActionScript and JavaScript, the latter is faster than the first one. Other than that, converting a game is a good occasion to revisit algorithms used in game code. With JavaScript game development you can optimize them or completely strip unused code that’s left by original developers. - Fixing bugs and making improvements to the gameplay
Having new developers looking into game’s source code can help to fix known bugs or discover new and very rare ones. This would make playing the game less irritating for the players, which would make them spend more time on your site and encourage to try your other games. - Adding web analytics
In addition to tracking the traffic, web analytics can also be used to gather knowledge on how players behave in a game and where they get stuck during gameplay. - Adding localization
This would increase the audience and is important for kids from other countries playing your game. Or maybe your game is not in English and you want to support that language?
Nope, we can’t do any magic tricks, but we have articles, books and webinars featuring techniques we all can use to improve our work. Smashing Members get a seasoned selection of magic front-end tricks — e.g. live designing sessions and perf audits, too. Just sayin’! 
Why Skipping HTML And CSS For In-Game UI Will Improve Game Performance
When it comes to JavaScript game development, it may be tempting to leverage HTML and CSS for in-game buttons, widgets, and other GUI elements. My advice is to be careful here. It’s counterintuitive, but actually leveraging DOM elements is less performant on complex games and this gains more significance on mobile. If you want to achieve constant 60 FPS on all platforms, then resigning from HTML and CSS may be required.
Non-interactive GUI elements, such as health bars, ammo bars, or score counters can be easily implemented in Phaser by using regular images (the Phaser.Image class), leveraging the .crop property for trimming and the Phaser.Text class for simple text labels.
Such interactive elements as buttons and checkboxes can be implemented by using the built-in Phaser.Button class. Other, more complex elements can be composed of different simple types, like groups, images, buttons and text labels.
Note: Each time you instantiate a Phaser.Text or PIXI.Text object, a new texture is created to render text onto. This additional texture breaks vertex batching, so be careful not to have too many of them.
How To Ensure That Custom Fonts Have Loaded
If you want to render text with a custom vector font (e.g. TTF or OTF), then you need to ensure that the font has already been loaded by the browser before rendering any text. Phaser v2 doesn’t provide a solution for this purpose, but another library can be used: Web Font Loader.
Assuming that you have a font file and include the Web Font Loader in your page, then below is a simple example of how to load a font:
Make a simple CSS file that will be loaded by Web Font Loader (you don’t need to include it in your HTML):
@font-face {
    // This name you will use in JS
    font-family: 'Gunplay';
    // URL to the font file, can be relative or absolute
    src: url('../fonts/gunplay.ttf') format('truetype');
    font-weight: 400;
}
Now define a global variable named WebFontConfig. Something as simple as this will usually suffice:
var WebFontConfig = {
   'classes': false,
   'timeout': 0,
   'active': function() {
       // The font has successfully loaded...
   },
   'custom': {
       'families': ['Gunplay'],
       // URL to the previously mentioned CSS
       'urls': ['styles/fonts.css']
   }
};
It the end, remember to put your code in the ‘active’ callback shown above. And that’s it!
How To Make It Easier For Users To Save The Game
To persistently store local data in ActionScript you would use the SharedObject class. In JavaScript, the simple replacement is localStorage API, which allows storing strings for later retrieval, surviving page reloads.
Saving data is very simple:
var progress = 15;
localStorage.setItem('myGame.progress', progress);
Note that in the above example the progress variable, which is a number, will be converted to a string.
Loading is simple too, but remember that retrieved values will be strings or null if they don’t exists.
var progress = parseInt(localStorage.getItem('myGame.progress')) || 0;
Here we’re ensuring that the return value is a number. If it doesn’t exist, then 0 will be assigned to the progress variable.
You can also store and retrieve more complex structures, for example, JSON:
var stats = {'goals': 13, 'wins': 7, 'losses': 3, 'draws': 1};
localStorage.setItem('myGame.stats', JSON.stringify(stats));
…
var stats = JSON.parse(localStorage.getItem('myGame.stats')) || {};
There are some cases when the localStorage object won’t be available. For example, when using the file:// protocol or when a page is loaded in a private window. You can use the try and catch statement to ensure your code will both continue working and use default values, what is shown in the example below:
try {
    var progress = localStorage.getItem('myGame.progress');
} catch (exception) {
    // localStorage not available, use default values
}
Another thing to remember is that the stored data is saved per domain, not per URL. So if there is a risk that many games are hosted on a single domain, then it’s better to use a prefix (namespace) when saving. In the example above 'myGame.' is such a prefix and you usually want to replace it with the name of the game.
Note: If your game is embedded in an iframe, then localStorage won’t persist on iOS. In this case, you would need to store data in the parent iframe instead.
How To Leverage Replacing Default Fragment Shader
When Phaser and PixiJS render your sprites, they use a simple internal fragment shader. It doesn’t have many features because it’s tailored for a speed. However, you can replace that shader for your purposes. For example, you can leverage it to inspect overdraw or support more features for rendering.
Below is an example of how to supply your own default fragment shader to Phaser v2:
function preload() {
    this.load.shader('filename.frag', 'shaders/filename.frag');
}

function create() {
    var renderer = this.renderer;
    var batch = renderer.spriteBatch;
    batch.defaultShader =
        new PIXI.AbstractFilter(this.cache.getShader('filename.frag'));
    batch.setContext(renderer.gl);
}
Note: It’s important to remember that the default shader is used for ALL sprites as well as when rendering to a texture. Also, keep in mind that using complex shaders for all in-game sprites will greatly reduce rendering performance.
How To Change Tinting Method With A Default Shader
Custom default shader can be used to replace default tinting method in Phaser and PixiJS.
Tinting in Phaser and PixiJS works by multiplying texture pixels by a given color. Multiplication always darkens colors, which obviously is not a problem; it’s simply different from the Flash tinting. For one of our games, we needed to implement tinting similar to Flash and decided that a custom default shader could be used. Below is an example of such fragment shader:
// Specific tint variant, similar to the Flash tinting that adds
// to the color and does not multiply. A negative of a color
// must be supplied for this shader to work properly, i.e. set
// sprite.tint to 0 to turn whole sprite to white.
precision lowp float;

varying vec2 vTextureCoord;
varying vec4 vColor;

uniform sampler2D uSampler;

void main(void) {
    vec4 f = texture2D(uSampler, vTextureCoord);
    float a = clamp(vColor.a, 0.00001, 1.0);
    gl_FragColor.rgb = f.rgb * vColor.a + clamp(1.0 - vColor.rgb/a, 0.0, 1.0) * vColor.a * f.a;
    gl_FragColor.a = f.a * vColor.a;
}
This shader lightens pixels by adding a base color to the tint one. For this to work, you need to supply negative of the color you want. Therefore, in order to get white, you need to set:
sprite.tint = 0x000000;  // This colors the sprite to white
Sprite.tint = 0x00ffff;  // This gives red
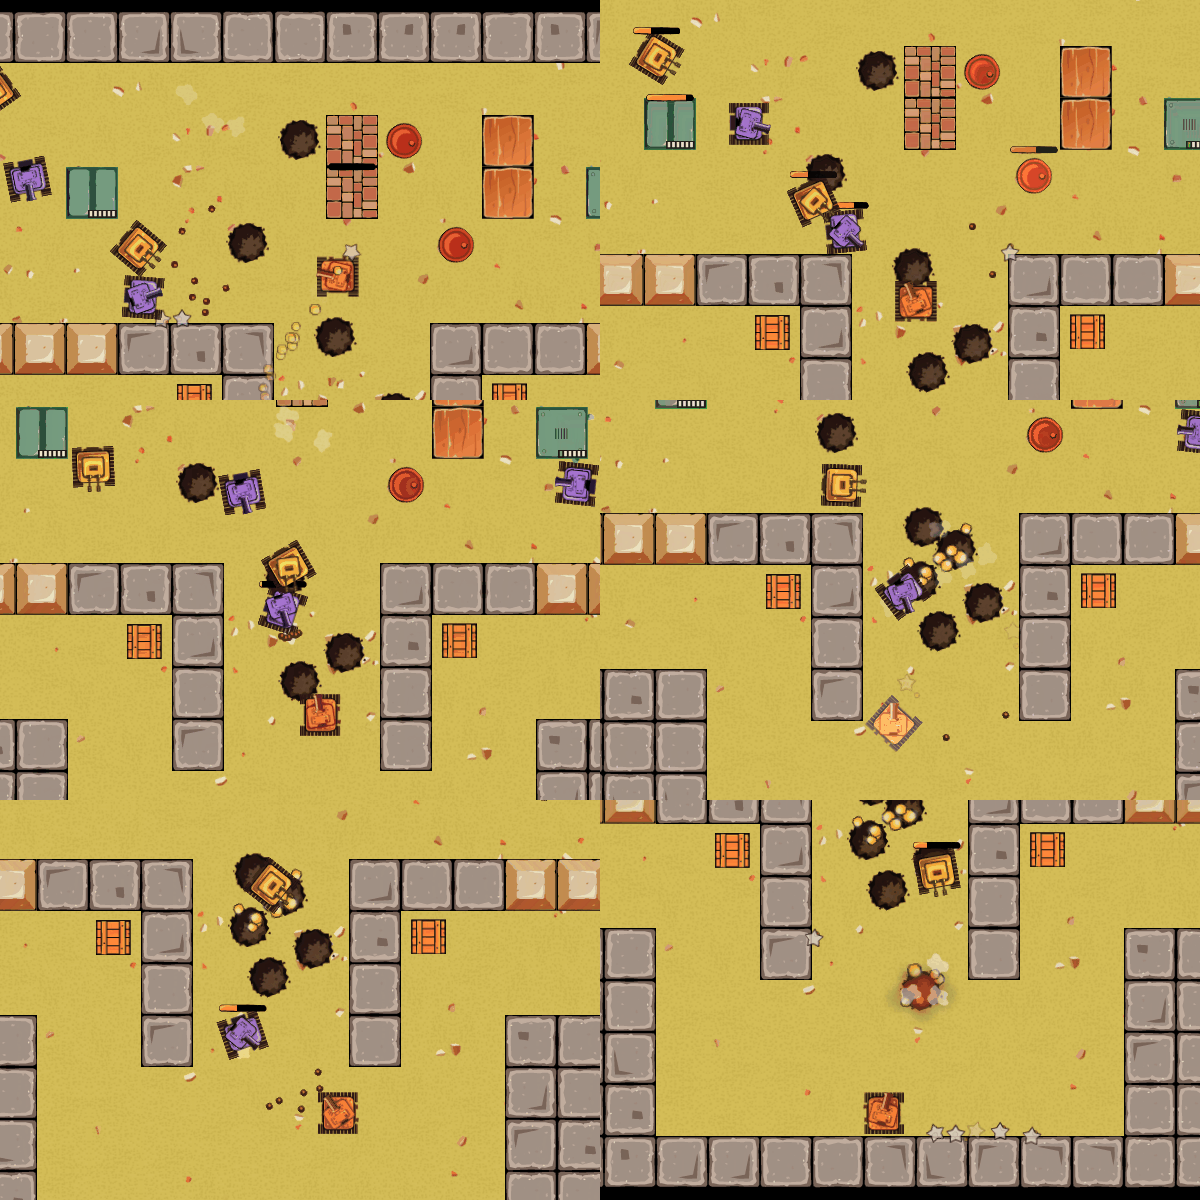
The result in our game looks like this (notice how tanks flash white when hit):
 Custom default shader (tanks flashing white).
How To Inspect Overdraw To Detect Fill Rate Issues
Replacing default shader can also be leveraged to help with debugging. Below I’ve explained how overdraw can be detected with such a shader.
Overdrawing happens when many or all pixels on the screen are rendered multiple times. For example, many objects taking the same place and being rendered one over another. How many pixels a GPU can render per second is described as fill rate. Modern desktop GPUs have excessive fill rate for usual 2D purposes, but mobile ones are a lot slower.
There is a simple method of finding out how many times each pixel on the screen is written by replacing the default global fragment shader in PixiJS and Phaser with this one:
void main(void) {
    gl_FragColor.rgb += 1.0 / 7.0;
}
This shader lightens pixels that are being processed. The number 7.0 indicates how many writes are needed to turn pixel white; you can tune this number to your liking. In other words, lighter pixels on screen were written several times, and white pixels were written at least 7 times.
This shader also helps to find both “invisible” objects that for some reason are still rendered and sprites that have excessive transparent areas around that need to be stripped (GPU still needs to process transparent pixels in your textures).
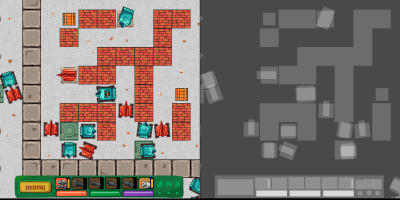
Overdraw shader in action. (Large preview)
The picture on the left shows how a player sees the game, while the one on the right displays the effect of applying the overdraw shader to the same scene.
Why Physics Engines Are Your Friends
A physics engine is a middleware that’s responsible for simulating physics bodies (usually rigid body dynamics) and their collisions. Physics engines simulate 2D or 3D spaces, but not both. A typical physics engine will provide:
- object movement by setting velocities, accelerations, joints, and motors;
- detecting collisions between various shape types;
- calculating collision responses, i.e. how two objects should react when they collide.
At Merixstudio, we’re big fans of the Box2D physics engine and used it on a few occasions. There is a Phaser plugin that works well for this purpose. Box2D is also used in the Unity game engine and GameMaker Studio 2.
While a physics engine will speed-up your development, there is a price you’ll have to pay: reduced runtime performance. Detecting collisions and calculating responses is a CPU-intensive task. You may be limited to several dozen dynamic objects in a scene on mobile phones or face degraded performance, as well as reduced frame rate deep below 60 FPS.
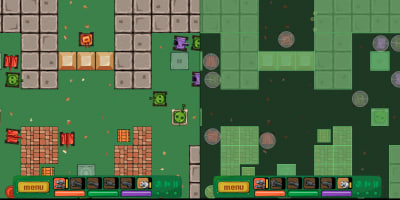
Phaser’s physics debug overlay. (Large preview)
The left part of the image is a scene from a game, while the right side shows the same scene with Phaser physics debug overlay displayed on top.
How To Export Sounds From A .fla File
If you have a Flash game sound effects inside of a .fla file, then exporting them from GUI is not possible (at least not in Adobe Animate CC 2017) due to the lack of menu option serving this purpose. But there is another solution — a dedicated script that does just that:
function normalizeFilename(name) {
   // Converts a camelCase name to snake_case name
   return name.replace(/([A-Z])/g, '_$1').replace(/^_/, '').toLowerCase();
}

function displayPath(path) {
   // Makes the file path more readable
   return unescape(path).replace('file:///', '').replace('|', ':');
}


fl.outputPanel.clear();

if (fl.getDocumentDOM().library.getSelectedItems().length > 0)
   // Get only selected items
   var library = fl.getDocumentDOM().library.getSelectedItems();
else
   // Get all items
   var library = fl.getDocumentDOM().library.items;

// Ask user for the export destination directory
var root = fl.browseForFolderURL('Select a folder.');
var errors = 0;

for (var i = 0; i
How to use the script to export sound files:
- Save the code above as a .jsfl file on your computer;
- Open a .fla file with Adobe Animate;
- Select ‘Commands’ → ‘Run Command’ from the top menu and select the script in the dialogue that opens;
- Now another dialogue file pops up for selecting export destination directory.
And done! You should now have WAV files in the specified directory. What’s left to do is convert them to, for example, MP3’s, OGG, or AAC.
How To Use MP3s In Flash To HTML5 Convertions
The good old MP3 format is back, as some patents have expired and now every browser can decode and play MP3’s. This makes development a bit easier since finally there’s no need to prepare two separate audio formats. Previously you needed, for instance, OGG and AAC files, while now MP3 will suffice.
Nonetheless, there are two important things you need to remember about MP3:
- MP3’s need to decode after loading, what can be time-consuming, especially on mobile devices. If you see a pause after all your assets have loaded, then it probably means that MP3’s being decoded;
- gaplessly playing looped MP3’s is a little problematic. The solution is to use mp3loop, about which you can read in the article posted by Compu Phase.
So, Why Should You Convert Flash To JavaScript?
As you can see, Flash to JavaScript conversion is not impossible if you know what to do. With knowledge and skill, you can stop struggling with Flash and enjoy the smooth, entertaining games created in JavaScript. Don’t try to fix Flash — get rid of it before everyone is forced to do so!
Want To Learn More?
In this article, I was focused mainly on Phaser v2. However, a newer version of Phaser is now available, and I strongly encourage you to check it out, as it introduced a plethora of fresh, cool features, such as multiple cameras, scenes, tilemaps, or Matter.js physics engine.
If you are brave enough and want to create truly remarkable things in browsers, then WebGL is the right thing to learn from the ground up. It’s a lower level of abstraction than various game-building frameworks or tools but allows to achieve greater performance and quality even if you work on 2D games or demos. Among many websites which you may find useful when learning the basics of WebGL would be WebGL Fundamentals (uses interactive demos). In addition to that, to find out more about WebGL feature adoption rates, check WebGL Stats.
Always remember that there’s no such thing as too much knowledge — especially when it comes to game development!
 (rb, ra, yk, il)
source https://www.smashingmagazine.com/2018/07/converting-flash-game-html5/
source https://derekpackard.com/what-do-you-need-to-know-when-converting-a-flash-game-into-html5/


No comments:
Post a Comment